

Canvas Prep For Acrylic Painting
Matt is a professional painter and freelance writer, sharing his knowledge, house-painting tips, and product reviews.
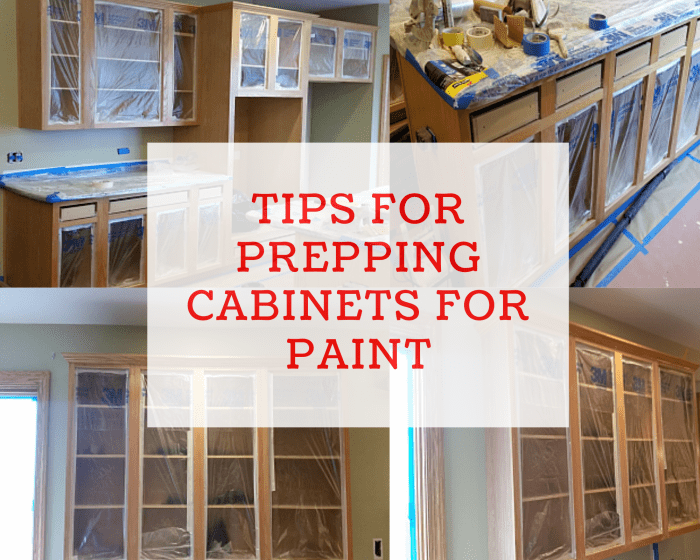
Prepping Cabinets for Paint
The most important part of cabinet painting is the surface preparation. When it's done wrong, you'll have problems with adhesion, but when done correctly, your painted cabinets will be durable and look awesome in the end.
Painting kitchen cabinets is different than painting drywall. There's more prep work involved. You can easily paint over drywall again if you don't like the color, but with cabinets, you'd have to strip everything off and start over if the paint fails from improper surface prep.
I do a lot of cabinet painting, and I'll show you how to prep your cabinets so the paint lasts and looks professional.
Clean the Cabinets Thoroughly
Primer and paint don't bond with dirty and greasy surfaces. Cabinets above a stove and below the sink are usually the worst and need to be carefully cleaned before sanding. First, remove all of the doors and hardware for easier cleaning and painting.
There are dozens of cleaning products available for prepping cabinets for paint, including liquid de-glosser, denatured alcohol, de-greaser, and TSP (trisodium phosphate). Dawn dish soap is a good cabinet cleaner for removing dirt and light grease, but it won't cut through thick grease.
Denatured Alcohol
I have experimented with several products over the years, but I use Dawn dish soap the most and denatured alcohol for heavy grease. Denatured alcohol is really good for cutting through tough grease, stains, and sticker adhesive. Denatured alcohol evaporates from the surface too, leaving no residue behind. TSP is a good cleaner, but it forms a residue on the surface that can cause adhesion problems if you don't rinse it all off.
Protective gloves should always be worn when handling denatured alcohol or liquid cleaner. If the cabinets aren't greasy, Dawn dish soap works fine for cleaning off dirt and food stains. Coarse scrub pads (green color) work well for wiping down the surface.
De-glossing
Most stained cabinets are coated with a protective lacquer finish, which should either be de-glossed with a chemical cleaner or sanded off. Removing the glossy lacquer dulls the surface, allowing primer and paint to bond better.
You can remove the lacquer with a de-glossing agent, but sanding thoroughly, which you're going to do anyway, will remove it that way too. I personally don't use de-glosser. I clean the surface and sand everything to de-gloss.
Start Sanding Your Cabinets
Some primer and liquid de-glosser products advertise no sanding needed on the label, but you should always sand, regardless of what's being advertised. I've never primed and painted cabinets without first cleaning and sanding everything thoroughly. Sanding takes off the glossy lacquer on top, exposing the bare wood so primer and paint can bond well with it.
Electric Sander
Using a random orbital sander is an absolute must when prepping cabinets for paint. Sanding multiple doors by hand takes way too long and won't be as effective as an electric sander. I personally use the Makita random orbital sander, equipped with five-inch sanding discs I buy from Home Depot.
You can sand the whole surface of a door with this sander, except the narrow paneled parts. Those areas require a quick scuff sanding with a folded sheet of sandpaper.
Sandpaper Grit
For the first sanding, to remove lacquer from the surface of cabinets and expose bare wood, 120 and 150 grit both work well for me. You can also use 100 grit, but I wouldn't go any lower than that because it's unnecessary and you'll damage the wood. For sanding in between primer coats, I like 220 grit. This grit will smooth out the surface really nice without removing the primer.
Remove Dust
Dust is your enemy when painting cabinets. Always remove dust from the surface after each sanding. Use a shop vac equipped with a brush attachment to remove heavy dust, followed by either a damp rag or a tack cloth.
I usually wipe it down with a lightly damp rag instead of a tack cloth. I've used the yellow tack cloths from Home Depot, but I no longer use them because they leave a yellow residue on the surface. You should also do your sanding outside if possible, away from where you'll be painting.
Caulk Molding and Cracks on Paneled Doors
Cabinet doors with recessed panels need to be caulked; otherwise, the cracks along the panel edges become very noticeable when painted. The best caulk to use is white paintable caulking, not clear. I buy all of my caulk from Sherwin Williams. I use their quick dry caulk (green and white tube) the most. The caulk dries in under one hour for paint.
Before caulking, it's important to make sure sanding dust has been completely removed from the surface and cracks you'll be caulking; otherwise, the dust will ruin your bead of caulk.
Caulking Floating Panels
Some cabinet doors have floating panels, which is when the center panel has some movement. There is a debate about whether floating panels should be caulked or left alone.
Some believe the caulk will crack and ruin the painted door, while others have no problems caulking these panels. I've personally been caulking floating panels on cabinet doors for many years, and I've never had any issues with this.
Apply Two Coats of Primer
The type of primer used when prepping cabinets for paint is very important. Stay away from latex primer. It's too soft and it won't keep the natural oil inside the wood from bleeding through into paint. The best primer to use when prepping cabinets is either shellac primer or oil-based primer. Both dry hard and totally prevent stains from bleeding into your paint. I use Zinsser BIN (shellac) the most, but Cover Stain (oil) is good too.
The best primer to use also depends on your application method. BIN is awesome for spraying, but it's extremely messy for rolling. BIN dries a lot faster than oil primer and the smell doesn't linger as long.
You can roll your primer, but if you're willing to learn how to spray, you'll have a superior finish spray painting your cabinets. For rolling, foam rollers work really well. They don't leave heavy stippling on the surface.
I spray all of my cabinet doors, including the wall boxes, using an airless sprayer. I recommend applying two coats of primer. Two coats provide added durability and ensure the surface is totally sealed before painting them.
This article is accurate and true to the best of the author's knowledge. Content is for informational or entertainment purposes only and does not substitute for personal counsel or professional advice in business, financial, legal, or technical matters.
Questions & Answers
Question: What is the best brand painter sprayer you buy?
Answer: I use contractor Graco and Titan sprayers not sold in big box stores. All of them are airless sprayers. Graco sprayers are easier to clean than my Titan sprayer.
Question: Can you use oil primer and then the Shellac? The Shellac doesn't stop the bleeding but the oil does. But I like the way the Shellac is smoother than oil. I didn't know if I could use both primers at the same time, or which one should be first?
Answer: There's no need to use both oil and shellac because shellac primer (BIN) alone will prevent wood tannin from bleeding into the paint. You will sometimes see traces of wood tannin in the primer after it dries, which might make you think the primer isn't working, but the tannin will not bleed into the paint. I do recommend applying two coats of shellac primer. Same thing for oil primer. If you use shellac primer, make sure you're using BIN white pigmented shellac primer, not the synthetic.
Question: Is a foam brush better than regular brush?
Answer: No, definitely not. Use a good quality paint brush for painting cabinets. Purdy, Corona and Wooster brushes are good. I use Purdy brushes.
Question: Home Depot has some Marquee semigloss paint and primer all in one, is this ok to use?
Answer: I don't think I've ever used Behr Marquee paint, but it looks like there's an enamel available in the Marquee product line. If you're going to use Marquee, I would at least use the enamel version so the paint is hopefully more durable than regular Marquee wall paint. I would personally use Sherwin Williams Pro Classic acrylic enamel, or Benjamin Moore Advance if you're painting cabinets. I have no idea if Marquee is durable, or how it performs for application.
Question: I just had unfinished cabinets put in. I used Bondo Glazing & Spot putty to fill in all of the nail holes. I've sanded everything smooth. There are some areas that I want to calk like corner seams. I noticed that you calk prior to primer. I always found it best to calk after primer. Am I doing it wrong?
Answer: You can do it either way, but I like to seal over the caulk with the primer.
Question: What Grit sand paper do you use between primer coats? 220 Grit.
Answer: In between coats of primer, sand the primer with 220-grit or 320-grit. Use the detailing sanding sponges, not sheets of sandpaper. The angled ones are perfect for paneled doors.
Question: Do you sand between the two coats of primer?
Answer: Yes, I sand between coats of primer.
Question: How far down should you sand cabinets before painting? Should I sand the paint away far enough that it's down to the raw wood?
Answer: No, you don't have to sand down to the bare wood. The main purpose of sanding is to remove the glossy clear coat and dull the surface for a better primer and paint bond. Depending on the type of wood, aggressive sanding can damage the wood fibers and leave marks that show through the paint. In between coats of primer and paint, scuff sand the surface with finer sandpaper grits of 220 to 320. For the first sanding before primer, I'll use 120-grit to 150-grit, depending on the type of wood.
Question: Can you go back and fill in the cracks in the panel once hop coat is applied?
Answer: Yes, but you'll need to sand and prime the patches before painting again.
Question: How do you sand the square corners with the DISC sander?
Answer: You can use a square-shaped sander to sand into the corners of cabinet doors, or use a sanding sponge of the same grit to sand the areas the disc sander can't reach.
© 2018 Matt G.
Matt G. (author) from United States on August 22, 2020:
I recommend not caulking the panels of the cabinet doors. I caulked them for many years without problems until recently when cracks formed on some doors I caulked. I don't caulk them anymore. Changing weather and humidity cause wood expansion. It actually looks fine not caulking the panels anyway.
mrcoombe on August 22, 2020:
I'm wondering what the weather is like where you live? I'm strongly considering caulking my cabinet doors - but where we live there are extreme temp changes and humidity, so I'm concerned. What are the climate conditions where you do most of your painting jobs?
Matt G. (author) from United States on April 26, 2020:
Cover Stain oil primer is easy to sand. You just have to let it dry overnight. I don't know if it's the easiest primer to sand, but it sands into a nice smooth finish.
Dustin on April 25, 2020:
Hey man I'm a Forman over painting at a cabinet shop and looking for your opinion. Sanding primer is a big issue here ,what oil/based primer you think is the easiest to sand but still has a good finish after being painted?
Rebecca on April 15, 2020:
All I can find is BIN Primer for wall/ ceiling. Is this correct? Also, do you tint your primer?
Calgary House Painter from Calgary, Alberta, Canada on March 15, 2019:
Really helpful article! Can't stress enough the importance of a good primer!
Canvas Prep For Acrylic Painting
Source: https://dengarden.com/home-improvement/Tips-for-Prepping-Cabinets-for-Paint
Posted by: cervantesobbect96.blogspot.com
0 Response to "Canvas Prep For Acrylic Painting"
Post a Comment